The dispatch board
The dispatch board
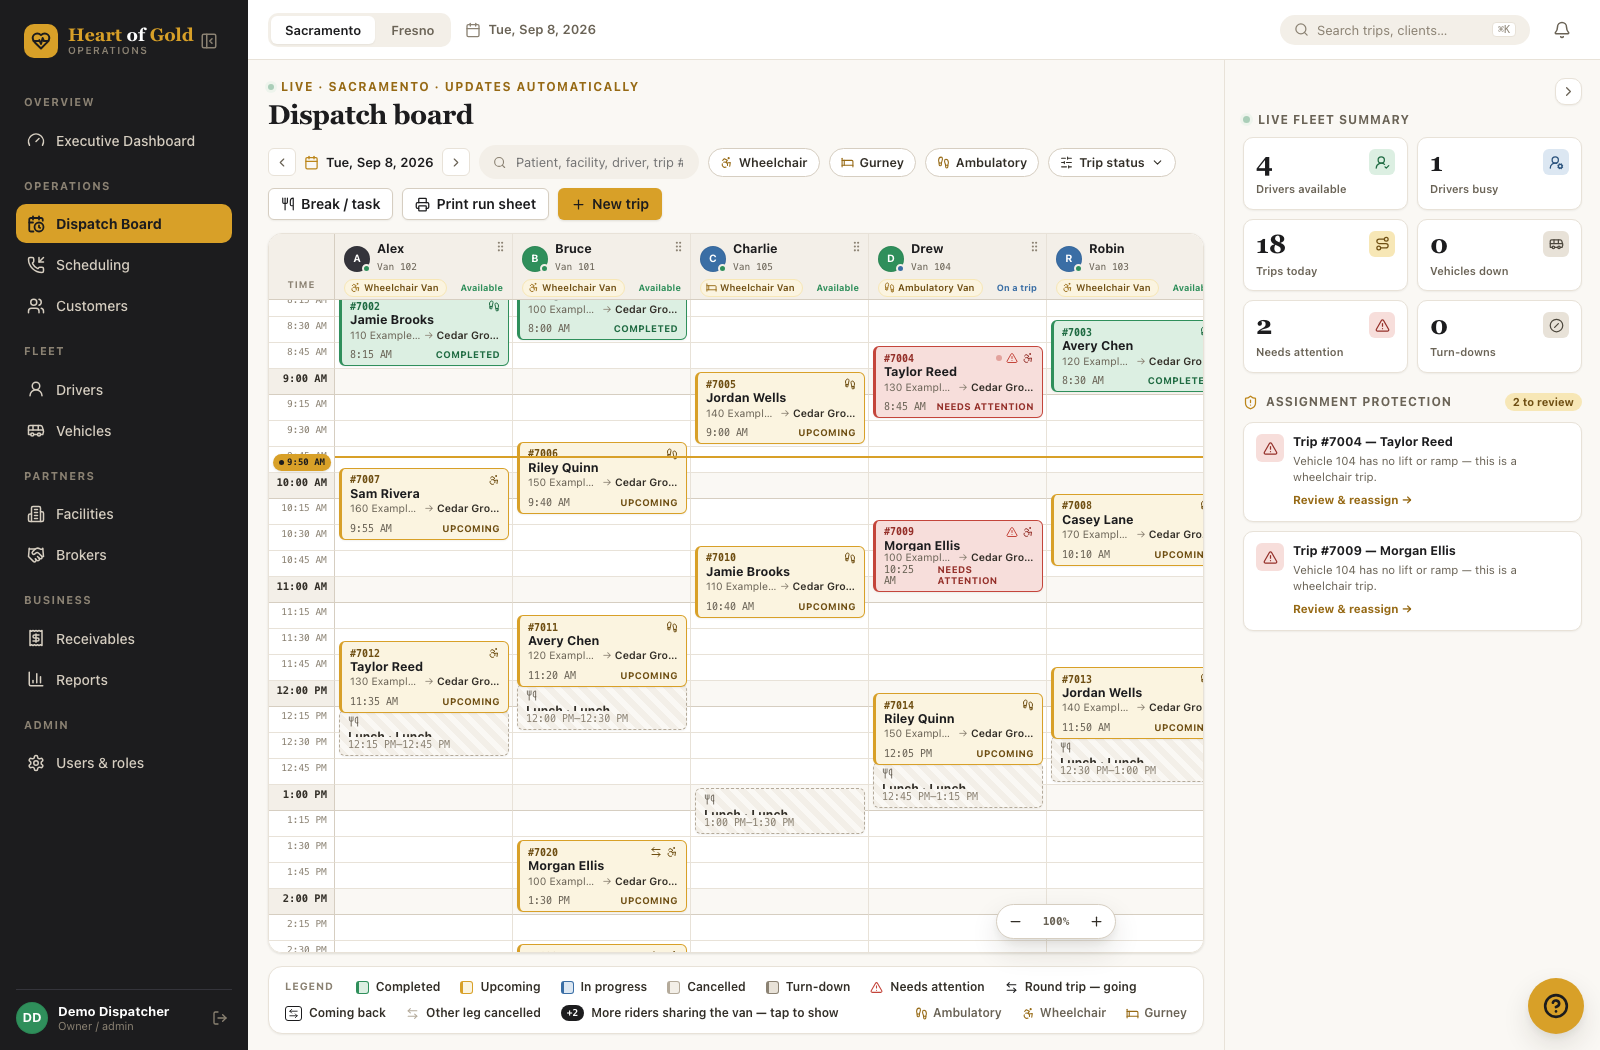
What this is for — seeing the whole day at a glance, one column per driver, and moving work between drivers by dragging it.
Where to find it
Left menu → Dispatch Board. It is also where you land after signing in.
How the board is laid out
- One column per driver, for the location selected in the top bar.
- Time runs down the page in 15-minute rows, from midnight to 11:45 PM. The board opens scrolled to roughly where you are now.
- A gold line marks the current time, with the clock time in a small tag on the left. It only shows when you are looking at today.
- Each trip sits in its own block, as tall as its travel time.
- Drivers who are off that day — a weekly day off, or all-day time off — do not get a column at all. Neither do inactive drivers.
The column headers
Each header shows the driver's name, a small coloured dot, and their van.
- The dot: green Available, blue On a trip, amber Off today, red Maintenance.
- The van name is a dropdown — change a driver's van for the day right there.
- Van taken in red means two drivers are down for the same van. Fix one of them.
- A small Sac or Fresno tag means the driver is normally based at the other location and is here on a scheduled stint.
Steps — assigning and reassigning
- Unassigned trips are listed in the right-hand panel under Unassigned — drag to a driver. That list holds every trip with nobody to drive it: trips with no driver yet, and trips still sitting on a driver who is off that day, off the roster, or working the other location that day.
- Drag the trip onto a driver's column.
- Columns that can take it light up green. Columns that can't go grey — hover for the reason (wrong equipment, driver already booked, no van).
- The drop point snaps to the trip's own pickup time; you cannot land it in the wrong slot.
- Let go. The driver's usual van comes along automatically.
Dragging a trip that is already on the board moves it to a different driver the same way. Dragging a card marked ASSIST hands over the second driver role and leaves the lead driver and van alone.
On a phone or tablet, if dragging doesn't work, open the trip and use the button on the Driver line — it reads Assign on a trip with no driver yet and Reassign once one is on it. See 06 — Trip details.
Steps — changing a trip's time or length on the board
Hover over a trip and two handles appear.
- The three dots at the top — drag up or down to move the pickup time. A card follows your cursor showing the new pickup and drop-off. When you let go, a message asks "Change trip #… pickup time to …?" — nothing moves without a yes.
- The bar along the bottom — drag to make the trip longer or shorter. It snaps to 15 minutes and the live card shows the new duration. No confirmation for this one.
If the trip repeats, the confirmation reminds you that the other trips in the schedule keep their old time.
The colours
The Legend strip under the board spells this out:

| Colour | Means |
|---|---|
| Gold | Upcoming — booked, not started |
| Blue | In progress — driver is on the way or has arrived |
| Green | Completed |
| Grey | Cancelled |
| Darker grey | Turn-down |
| Red with a ⚠ | Needs attention — a safety rule is broken |
Round-trip marks
Trips that are half of a round trip carry a small two-arrow mark next to the mobility icon:
| Mark | Means |
|---|---|
| ⇄ (plain arrows) | Round trip — going — this is the ride out |
| ⇄ inside a small box | Coming back — this is the ride home |
| Greyed-out arrows | Other leg cancelled — the ride out or the ride home was cancelled; open the trip to see who cancelled it and add a new return if needed |
| Black +N badge | More riders sharing the van — tap to show them |
Tap the mark to jump straight to the other leg. One-way trips carry no mark.
Combined rides — seeing who is in the van
When the office answers Yes — they ride together to the shared-ride question (on the booking form, when dropping a trip onto a driver, or in the trip panel), those riders are drawn as one box on the driver's column. People call this a combined ride, a shared ride, or a double-up — it is all the same box.
You are asked the question in two situations: when the two trips overlap in time, and when one is picked up right as the other finishes. The second one used to show a "Tight turnaround" warning with no way to answer it — now you can say they are riding together and the warning goes.
Seeing everyone's name
The box lists every rider by name, one line each, down from the top. Each line shows the trip number, the client's name, their mobility icon, and — for anyone picked up after the first — their own pickup time. Tap any rider's line to open that trip in the right-hand panel.
If the box is short, not every name has room:
- A black +N badge sits in the bottom-right corner of the box. Tap it and the box slides down and lists everyone by name. Tap − to fold it back.
- A very short box — a trip too brief to fit even one full line — shows the rider count and the riders' last names run together on one line instead. The +N badge is still in the corner; tap it to see the full names.
So if a combined ride looks like it is not showing you who is in it, the box is just too short for the names. Tap the +N badge.
How to read the box
- The box runs from the first pickup to the last drop-off.
- When someone is dropped off before the others, a one-line card sits inside the box at their drop-off time.
- Each rider's line takes that rider's own colour — a rider who has been dropped off turns green while the others are still blue. The outer box shows the group: blue while anyone is aboard, green when everyone is out.
The riders keep their own trip numbers, prices and invoices — the box is only how the board shows them. If a trip is moved so it no longer overlaps the others, it leaves the shared ride and goes back to its own card.
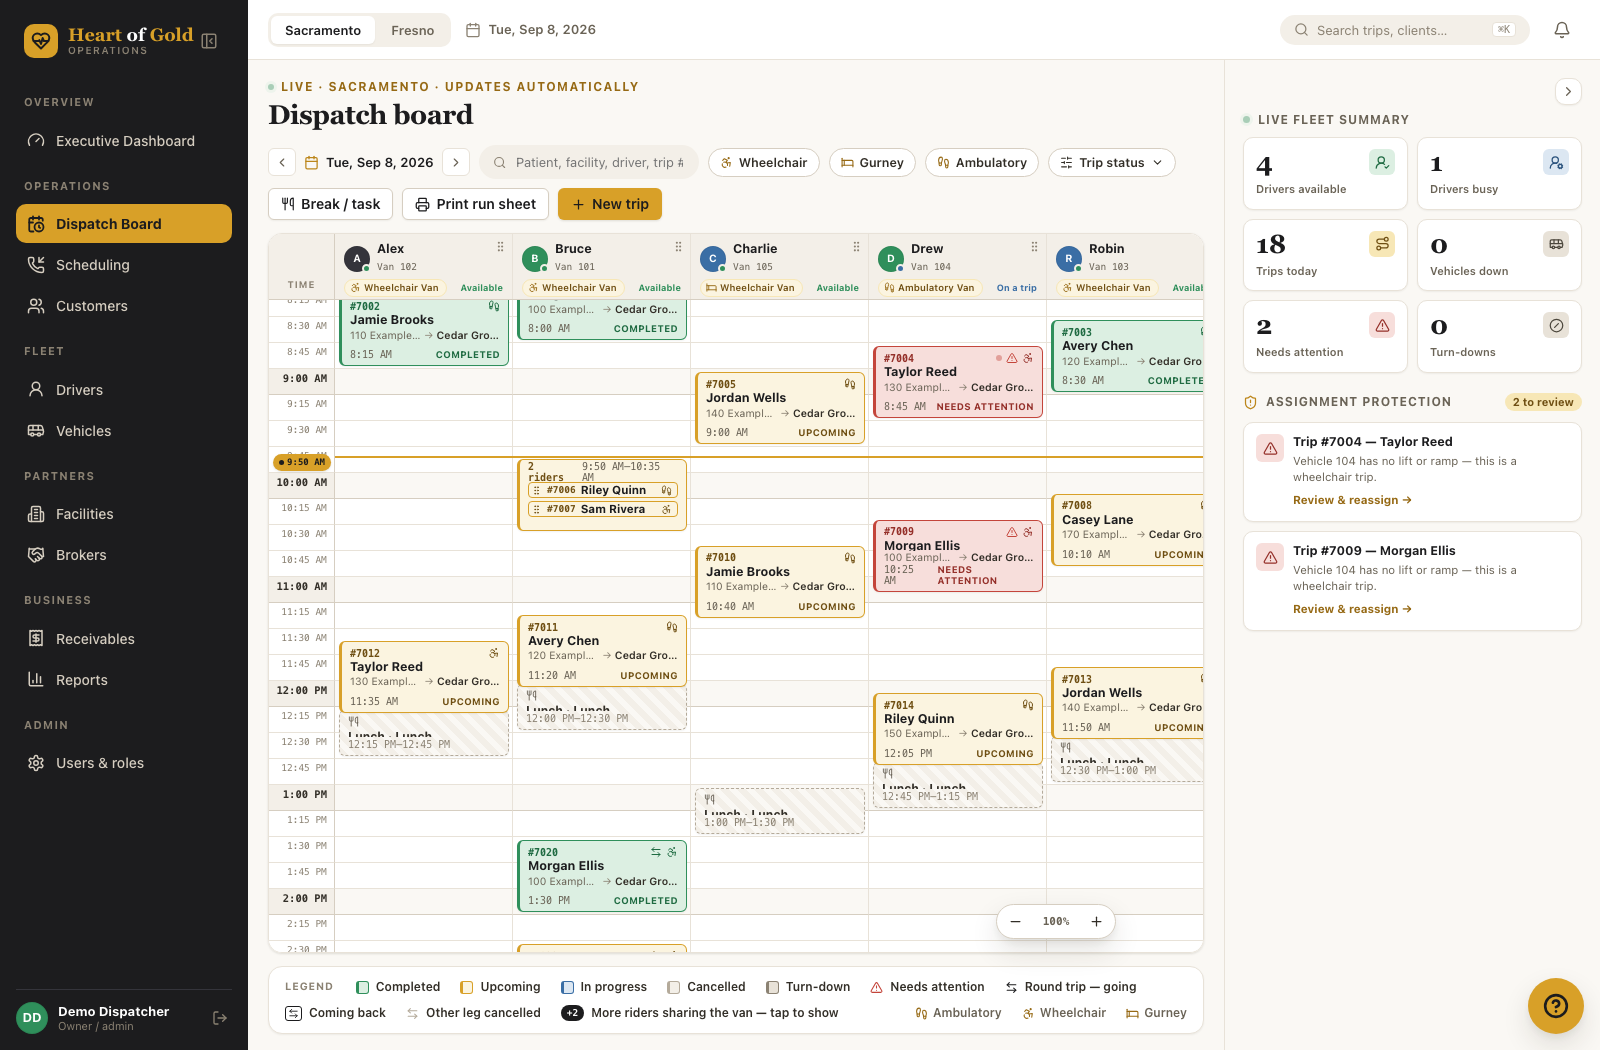
Moving a shared ride
- Drag the box sideways onto another driver to move everyone aboard. A card lists each rider with their own check — ok, a warning, or a red reason the system can't allow — and offers Move all, Move the ones that are OK (when some can't go), or Cancel.
- Drag the dots at the top of the box up or down to move everyone's pickup by the same amount. You're asked to confirm, with each rider's new time listed.
- Drag a rider's row sideways to move just that rider to another driver. Drag the small ⋮⋮ grip at the start of their row up or down to change just their pickup time (asks to confirm, as any time change does).
- Drag the bar at the bottom of the box to change the drop-off of whoever is last — nobody else moves.
- The box redraws itself once the change is saved. A rider moved out of the others' time window leaves the shared ride and gets their own card.
Filters and searching the board
- The search box (Patient, facility, driver, trip #) dims everything that doesn't match. Type a driver's name and the board narrows to just their columns.
- The Wheelchair / Gurney / Ambulatory buttons dim trips of other types.
- Trip status opens a tick list to dim statuses you don't want to look at.
Filters dim rather than hide, so you never lose track of what's really there.
Making the board fit
- Zoom — the – / % / + control floats at the bottom-right. Zoom out to fit more drivers on screen; the middle button resets to 100%. The setting is remembered on that computer.
- Narrow the left menu — the arrow at the top of the menu.
- Shrink the right panel — the small arrow button at the top of the panel makes the fleet summary compact.
- Reorder the columns — grab the grip at the top-right of a column header and drag it over another column. This order is yours alone and follows your login; it doesn't change anyone else's board.
The right-hand panel
When no trip is selected, the panel shows:
- Unassigned — drag to a driver — every trip nobody is driving. A gold
HOLD tag means it came from the call log. Two more tags mark trips that
still have a name on them but no column on the board, so they can never go
missing:
- DRIVER OFF — REASSIGN, with a line saying "[driver] is off this day — still on this trip". The driver has a day off, or time off covering this date. Drag the trip to someone else.
- DRIVER AWAY IN FRESNO — REASSIGN (or IN SACRAMENTO), with a line saying "[driver] is working Fresno this day — still on this trip". The driver is scheduled at the other location on this date, so their column is on that location's board, not this one. Drag the trip to someone here.
- DRIVER OFF ROSTER — the driver was archived or set to inactive.
- Lunch check — a nudge when a driver's day runs past about five working hours with no lunch booked, with an Add a lunch block → shortcut. It is a suggestion; you choose the real slot.
- Live fleet summary — drivers available, drivers busy, trips today, vehicles down, needs attention, turn-downs.
- Assignment protection — every trip with a warning or no driver, with Review & reassign → to open it.
Click any trip and the panel becomes the trip's detail panel instead.
Printing run sheets
- Click Print run sheet at the top right.
- A clean page opens in a new tab: one section per driver, their trips in order with times, client and phone, the route, and driver notes.
- Breaks and tasks appear as a strip under each driver's name.
- Unassigned trips are listed at the bottom in a dashed box.
- Click Print.
The run sheet follows the date and location currently on the board.
A ride home shows the same suite or department next to its pickup as the ride out shows next to its destination, so the driver going back has it on paper.
Good to know
- The board updates by itself — no refreshing. When you open it, it scrolls to a little before the current time; after that it stays where you leave it. The red line keeps moving on its own.
- A Time off stripe on a driver's column (a partial-day time off) opens that driver's record when you click it, scrolled to Requested time off, so you can change or remove it there.
- Break / task adds a lunch, an off-duty split, or a job like an oil change. See 07 — Breaks, tasks and time off.
- New trip takes you to the booking form.
- A trip with two drivers appears on both columns. The second driver's copy wears an ASSIST tag. It still counts as one trip and one invoice.
- Cancelled trips stay on the board, faded and struck through, so nobody wonders where a trip went. They are not deleted and not moved to an archive — open one and click Restore trip to bring it back (06 — Trip details).
- Use ‹ and › by the date to move a day at a time; Today jumps back.
- To jump to any date, click the date itself (the calendar icon). A calendar opens where you can pick a day, change month, or change year — no more clicking the arrow twenty times to reach a date next month.
If something looks wrong
- "No drivers in this region yet" — check the Sacramento / Fresno switch, and that the drivers are marked active for that location.
- A client's name is misspelled — click the trip, then click the client's name at the top of the panel (or find them on 08 — Customers) and edit First name and Last name. The correction reaches every trip, past and upcoming.
- A trip shows "Tight turnaround: only 0 min" for two riders who are actually travelling together — open the trip, use Reassign, and answer Yes — they ride together when asked. The two then draw as one box and the warning stops.
- A trip in the Unassigned list says DRIVER OFF ROSTER — its driver was archived or set to inactive while still assigned. Drag it to another driver.
- A trip in the Unassigned list says DRIVER OFF — REASSIGN — the driver it is booked with is off that day, so they have no column to show it on. The trip has not been touched and nobody has been taken off it; it is simply kept in plain sight until you drag it to another driver.
- A trip in the Unassigned list says DRIVER AWAY IN FRESNO (or SACRAMENTO) —
REASSIGN — the driver is scheduled at the other location that day, so their
column is on the other board. Nothing has been moved; the trip still has their
name on it.
- Click the trip to check the pickup time and needs.
- Drag it onto a driver column here that lights up green.
- If the driver really will do it, change their dates under Drivers → Scheduled at another location instead — see 10 — Drivers.
- A driver's column is missing — they are off that day (weekly day off or time off), inactive, or scheduled at the other location. If they are off that day, inactive, or scheduled at the other location, any trips still booked with them on this board for that day show in the Unassigned list so they stay visible.
- A trip you booked isn't on the board — it probably has no driver yet, so it's in the Unassigned list on the right. Check the date and the location switch too.
- A column won't accept a drop — hover it for the reason. Usually the van has no lift or ramp, can't take a gurney, is out of service, or the driver is already booked at that time.
- Red "Van taken" — two drivers are assigned the same van. Change one of them in the column header.
- The board scrolls back up while you're working — it re-centres on the current time. Scroll back down; your work is not affected.