Trip details — changing a booked trip
Trip details
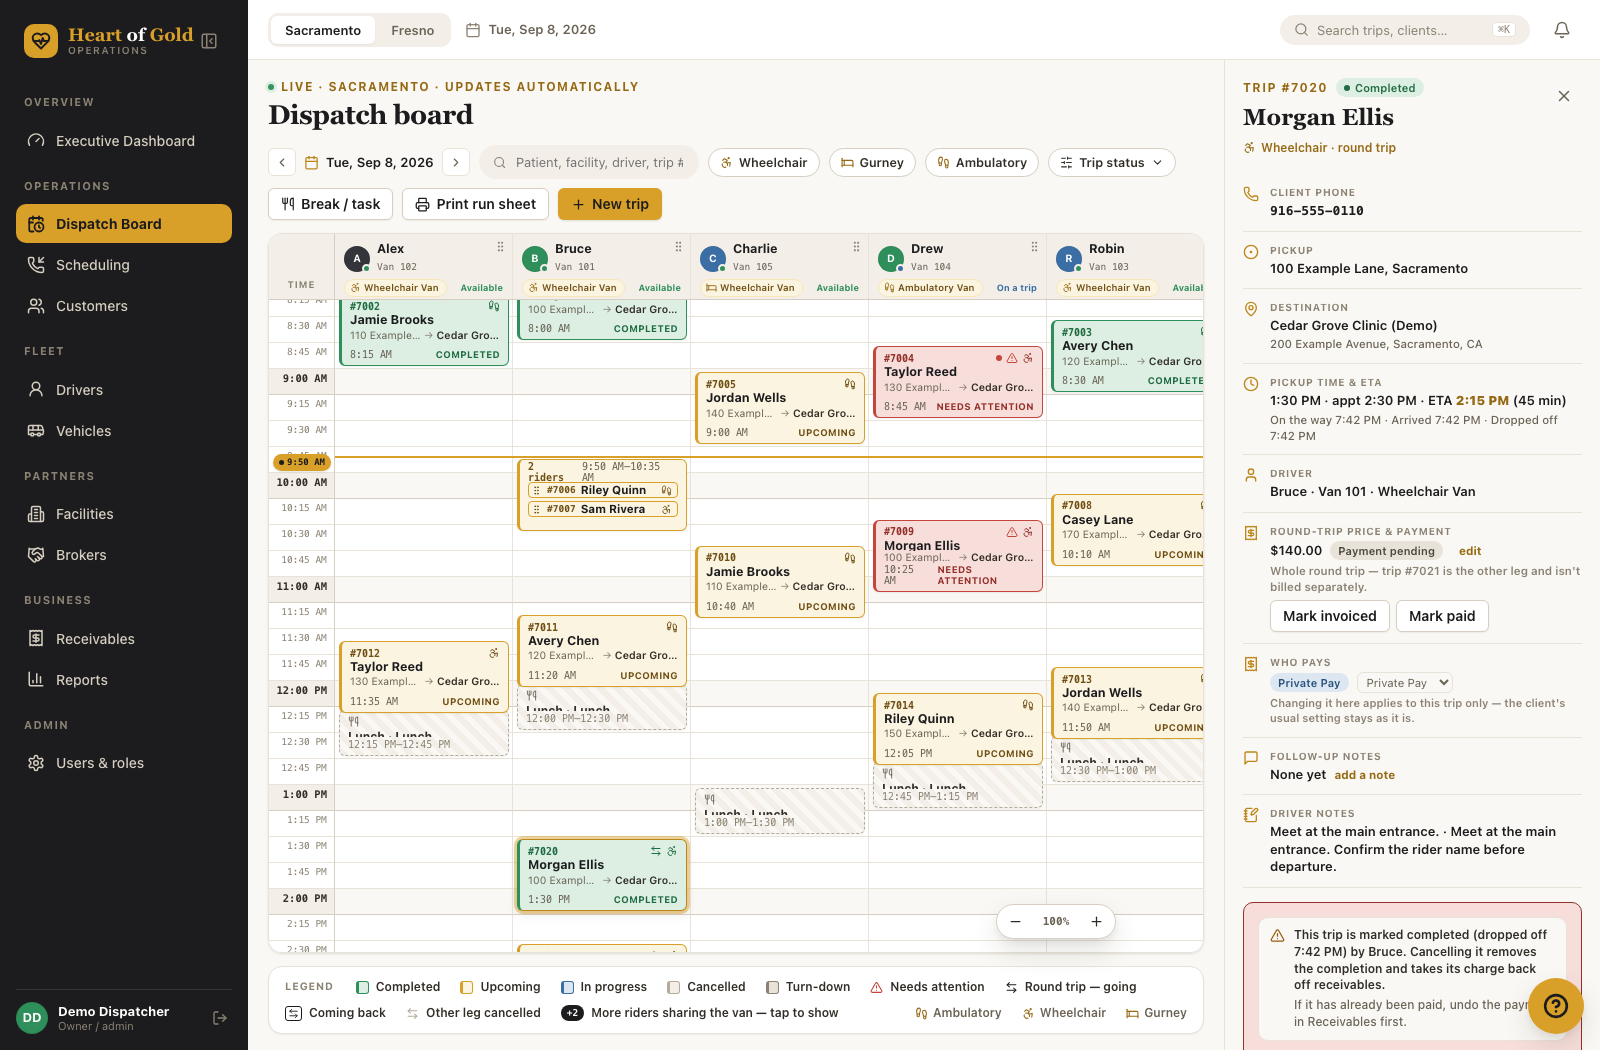
What this is for — everything you can change about a trip after it has been booked, all in the panel on the right of the dispatch board.
Where to find it
Left menu → Dispatch Board → click any trip block. The panel on the right becomes the trip. ✕ at the top closes it. Trips opened from Scheduling, the callback list or search land here too.
What the panel shows
Down the panel, in order (rows only appear when they apply):
- Cancelled by the driver — on a trip a driver cancelled from their phone: who, when, whether it was at the door or before arriving, their answers to did you call and did you knock, and the reason they gave.
- Cancelled — on a trip the office cancelled: the reason picked in the cancel box, who cancelled it and when.
- Person calling · at booking — who rang and the number they gave when the trip was booked. It stays as it was, on purpose.
- Client phone — the client's current number.
- Pickup, any Stops, Destination.
- Pickup time & ETA — pickup, appointment time, arrival estimate, and the driver's own timestamps once the trip runs.
- Driver — driver, van, and the second driver if there is one.
- Broker and Authorization #.
- Price & payment (or Round-trip price & payment). On a cancelled trip with a fee it also shows Cancellation fee $… · invoice #…-C and where that invoice stands: Open, Invoiced (sent to the payer), Paid or In collections. While it is Open, Mark fee invoiced and Mark fee paid sit right there for it — see Marking a cancellation fee invoiced or paid below. The amount is read from the invoice itself, so it is exactly what Receivables bills. If the trip's own record ever says a different amount, an amber line under it says so — use Change fee to put both right. A fee that was waived to $0 shows No fee (waived) instead, with the voided invoice number next to it — see Steps — changing a cancellation fee below. A trip that was cancelled with a fee and then restored keeps that fee line too, with a sentence under it saying what happens to the fee and the fare — see A restored trip that had a cancellation fee below.
- Who pays — on every trip, both legs of a round trip included. Before the trip is billed it reads "Set when the trip is completed." See Who pays below.
- Bill to — which facility or broker gets the invoice, with the rider's name after it ("Sherwood Health Care Center · rider: Pat Smith"). See Bill to below. Follow-up notes appear once the trip has been billed. Who pays, Bill to and Follow-up notes are for Executive, Billing and Dispatcher accounts; Intake accounts don't see them (they can't open billing records), and the rest of the panel works the same for them.
- Caretaker riding along and Emergency contacts.
- Driver notes and Office / dispatch notes.
Warnings from the safety checks sit at the top in amber or red. So does the amber Cancelled by the driver band when a price still needs deciding — see Steps — after a driver cancels from their phone below.
Steps — changing the appointment time
- Click edit appt (or add appt) on the Pickup time & ETA row.
- Set Appointment time. Leaving it blank and saving removes it.
- Click Save.
Steps — changing the pickup time or the date
- Click Move time.
- Set Date, Pickup time, and Travel (min).
- For a repeating trip, choose Just this trip or This and all N future trips.
- Click Save.
Steps — changing the pickup or destination address
- Click the small edit link on the Pickup or Destination row.
- Type the new address. Suggestions appear: the client's saved places first, then matching facilities. Click one to fill it in.
- Choose how far the change reaches:
- Just this trip — a one-time change
- This and all future trips — the address changed for good (also updates the client's saved address)
- On a round trip, Also update the return trip is ticked by default. It changes the ride home only when the ride home picks up at this same place; a ride home that goes somewhere else is left alone. Untick it to change just this trip.
- Click Save.
The Department (optional) box appears for both the pickup and the destination. On the ride home, the pickup shows the same suite or department as the ride out, and leaving Also update the return trip ticked keeps the two in step when you change the ride out's address or department. If you change a pickup to a different place and leave the Department box alone, the old department is cleared; type the new one if there is one.
Only the address changes. The time, driver, van and price are untouched.
The trip already ran — yesterday's trip, or any completed trip
Once a trip is marked completed there is no edit link on the Pickup or Destination row. That is why a trip from yesterday looks like it can no longer be corrected. It can — put it back to scheduled first, fix it, then finish it again.
- Open the trip on the dispatch board. Move the board back to that day, or find the trip with 19 — Search.
- Click Reopen — back to scheduled.
- The edit link is now on the Pickup and Destination rows. Change the address as above.
- Click Mark complete again.
Choose Just this trip — a one-time change when you are only correcting the record of a trip that has already happened. This and all future trips also rewrites the client's saved address, so use it only when the client has really moved.
Nothing is charged twice. If the trip has already been paid, reopening leaves the payment alone, and completing it again does not raise a second invoice.
If the trip is completed but not yet paid, reopening takes its invoice back off Receivables and completing it again puts it back at the same amount with the same invoice number. Two things do not come back with it: the Invoice sent stamp, and any follow-up notes on that invoice. Check both afterwards and mark it sent again if it had already gone out.
The same Reopen — back to scheduled step is what unlocks Move time, Add a stop and the notes rows on a trip that has already run.
Steps — changing the price
Executive and Billing accounts can always do this. Dispatchers can too unless an Executive has turned it off in Settings → Permissions.
- Click edit next to the amount on the Price & payment row.
- Type the new figure. On a round trip this is the price for both legs together.
- For a repeating trip, choose Just this trip — a one-time price or This and all N future trips at this price — the rate changed.
- Click Save.
An open invoice updates with it. A paid invoice locks the price.
Who pays
Once a trip is billed, the Who pays row shows Private Pay, Facility Invoice (a facility, organisation or broker is billed — the same words as on the booking form) or Unassigned, and under it the invoice number and the rider's name. Which facility or broker is billed is on the Bill to row just below.
A round trip is billed once, on one leg. The other leg shows the same Who pays with "Round-trip invoice — it sits on trip #…, the other leg, and covers both." Changing it from either leg changes that one invoice.
Before the trip is completed there is no invoice yet, so the row reads "Set when the trip is completed." A cancelled trip with no fee, or a completed trip with no price, says there is nothing to bill.
Executive, Billing and Dispatcher accounts can change this by default — an Executive can turn it off for a role in Settings → Permissions.
To change it:
- Use the small dropdown on the Who pays row: Unassigned, Private Pay or Facility Invoice.
- It saves straight away and shows set by hand.
Intake accounts don't see this row at all — see What the panel shows above. An account that can see billing but lacks this permission (a role Caleb has switched it off for in Settings → Permissions) sees the dropdown greyed out instead, with "Ask an Executive to turn on 'Change who pays / Bill to' in Settings → Users & roles." under it.
Bill to
Who pays says what kind of payer it is; Bill to says exactly who: the facility or broker the invoice goes to, or the client on a Private Pay trip. It shows on every trip, billed or not, with the rider's name after it.
What you may see:
- A name in plain text — someone chose it: at booking, or with Change Bill to. It is what goes on the invoice.
- A name with from client's facility (or from the trip's broker) in amber under it — nobody has chosen it yet. The CRM worked it out from the client's usual facility (or the broker on the trip) so you have something to go on, but it is not confirmed. Trips billed before Bill to was added (September 2026) all show this way until someone confirms them.
- Private Pay after the client's name — the client pays.
- Bill to not set (amber) — nothing is known yet: no facility on the client's record and no broker on the trip.
A round trip is billed once, so both legs show the same Bill to.
Executive, Billing and Dispatcher accounts can change this by default — an Executive can turn it off for a role in Settings → Permissions (same setting as Who pays, above).
To change it or confirm it:
- Click Change Bill to on the Bill to row.
- In the Bill to list, pick the facility, the broker, or — at the bottom — the client (Private Pay). A worked-out name is already picked; to confirm it, just save.
- Only if this facility is where the client lives or usually rides from: tick Also set as this client's usual facility. It is off unless you tick it, and it changes the client's record, so later trips pre-fill with it.
- On a trip that repeats, choose Just this trip or This trip and the N later trips in the series.
- Click Save Bill to. (Cancel closes the box without saving.)
What changes: the trip's invoice (and any other open invoice of the same trip, such as a cancellation fee), and both legs of a round trip, so an invoice raised later on the trip follows. Choosing a facility or broker sets Who pays to Facility Invoice; choosing the client sets it to Private Pay. Choosing a facility on a broker trip takes the broker off that invoice. The change is written to the activity log with the old and the new name (and any broker taken off).
Only an open invoice can change. When the trip's invoice is paid, in collections or voided, the Change Bill to link is replaced by "Invoice #… is already paid, so its Bill to can't be changed." (or is in collections / was voided). Other invoices of the same trip in those states keep what they had.
Changing Who pays from Private Pay to Facility Invoice (or Unassigned) clears the client as the Bill to. The row then shows a worked-out payer with the amber from client's facility hint, or Bill to not set — pick the right one with Change Bill to.
Intake accounts don't see the Bill to row at all — see What the panel shows above. An account that can see billing but lacks this permission sees the Bill to but not the Change Bill to link, with "Ask an Executive to turn on 'Change who pays / Bill to' in Settings → Users & roles." under it.
"Billed on trip #…"
A round trip is one job at one price. One leg carries the money; the other says "Billed on trip #5225 — $140.00 for the round trip." That is correct — it is not a missing charge. Editing the price from either leg changes the same money.
The price check after a change
Move a leg of a priced round trip, or change its address, and a gold bar asks:
This round trip is priced at $140.00 — does that stay the same?
Click Keep $140.00 or Change it….
Steps — changing the notes
- Click edit on either notes row.
- Fill in Notes for the driver (this trip) and/or Office / dispatch notes.
- Click Save.
The client's standing notes are shown alongside; edit those on the client's record, not here.
Steps — assigning or changing the driver and van on one trip (phone, tablet or computer)
Use these steps to assign a trip, or to change its driver or van, for one trip. They work the same on a phone or tablet as on a computer, so you never need to drag the trip on the board. If you are on a phone and can't drag, this is the way to change a driver's van for a trip.
This does not change the driver's Usual vehicle. That is their van for every future booking, and it is set on their record — see 10 — Drivers.
- Open the trip so its panel is showing, then click Assign (it reads Reassign once a driver is already on the trip), or click the small assign / edit link at the end of the Driver row — both open the same panel.
- Pick the Driver. Their usual van comes with them. Drivers who are off that day are marked (off this day).
- Pick the Vehicle if it should be a different one. A van that belongs to
another driver is labelled "—
's van" , and a warning tells you that driver will show Van taken until they get another. - Pick a Second driver (two-person assist) if the trip needs two people. Gurney trips prompt for this.
- Once a driver is picked, choose one. This choice resets to Just this
trip every time you open the panel, so it never carries over from the
last trip you reassigned:
- Just this trip — the change applies only here.
- This and all of this client's future trips — the same driver is put on every other trip this client still has scheduled from today forward (or from this trip's date, whichever is later), whether or not it's a repeating booking. A trip already on this same driver is left as it is (nothing to change). A trip already sitting with a different driver is left alone rather than taken away from them. A trip that would double-book the driver — they already have a trip, or the van is already out, at that same time — is skipped, because there's no one here to ask "will they ride together?" the way the board does. A trip that would truly conflict with the driver's day (day off, requested time off, and so on) is skipped too. A trip that's only a held phone-log spot, not a real booking yet, is left alone as well. Every skipped trip needs to be reassigned by hand. A trip left with no van picks up this driver's usual one, the same as a new booking would.
- Click Save assignment. A note under the button then says how many trips changed, and lists exactly why any were skipped — already on another driver, double-booked, a scheduling conflict, or still just a held spot.
Steps — adding a stop
- Click Add a stop.
- Fill in Stop — address or place, Time, and Stop notes.
- Click Add stop to this trip.
To take one off, click remove on that stop's row.
Steps — adding a missing return leg
If a trip was booked as a round trip but has no ride home, the panel says Return leg missing in red and offers a fix. The same fix appears when the return leg was cancelled — the panel then says which trip number was cancelled, by whom and when, and the reason given.
- Click Add return leg.
- Either set a Return time, or tick Will call.
- Click Add return leg.
The price stays as one round-trip fare; nothing is charged twice.
Steps — running the trip
The buttons at the bottom change with the trip's status:
- Start trip — moves it to In progress.
- Mark complete — finishes it and creates the receivable.
- Undo start — puts an in-progress trip back to upcoming.
- Reopen — back to scheduled — un-finishes a completed trip. Its unpaid fare invoice is pulled back with it. A cancellation fee invoice (#…-C) is never pulled back — it belongs to the earlier cancellation.
- Restore trip — brings a cancelled or turned-down trip back.
Cancelled by mistake? Nothing is lost
A cancelled trip is not deleted and does not go into an archive you have to dig through. It stays exactly where it was on the dispatch board for its day, faded and struck through, and it keeps its trip number and all its details.
To get it back: open the trip and click Restore trip. You do not need to re-enter it. (If the cancellation charged a fee, the fee invoice stays exactly as it was — see A restored trip that had a cancellation fee just below.)
If you then cancel it again, the cancel box tells you the trip already has a fee on an invoice from the first time. There is no No fee choice then: pick Keep the $… fee, or (Executive and Billing accounts) Change it to… or Full fare to change that same invoice to the new amount. No second fee is ever raised, and the trip and Receivables always show the same amount.
A restored trip that had a cancellation fee
Restoring a trip never touches its fee: the #…-C invoice keeps its amount, and anything already sent or paid on it stays that way. If the trip then runs, it is billed its fare as well, so it ends up with two invoices — the fare (#…) and the fee (#…-C). Both show on 12 — Receivables.
- Open the restored trip. Under Price & payment you see Cancellation fee $… · invoice #…-C and a sentence saying the fee stays on that invoice.
- When the trip has run, click Mark complete as usual. The fare invoice is created then, the same way as for any trip (a round trip is still billed once, on one leg).
- The sentence under the fee now names both invoices: "…so it has two invoices: the fare on invoice #… and the cancellation fee on invoice #…-C." Who pays, Mark invoiced and Mark paid on this trip are about the fare; the fee is handled on its own line.
- If the fee is the wrong amount, an Executive or Billing account clicks Change fee next to it (see Steps — changing a cancellation fee). If the fee should no longer be charged at all now that the trip ran, the fee invoice has to be voided — ask Josue; there is no button for that yet.
Two more buttons on the same row
- Client called — on a Will call trip: sets the pickup about 15 minutes out and opens the time box so you can adjust.
- Text client — stages a reminder. No text is sent today.
After any status change, a bar appears saying what changed with an Undo button. That is the fastest fix for a mis-click.
Steps — cancelling a trip
- Click Cancel trip…. It is there on an upcoming trip, a trip in progress, and a trip already marked completed.
- Choose What happened — Cancelled at the door — client not going, No-show — nobody came, Cancelled in advance (day before), or Other. Add a note in Details (optional) if you want one.
- On one leg of a round trip you're asked whether to also cancel the other leg — "Also cancel the ride home — trip #5233 at 2:30 PM". Cancelling the ride out ticks this for you (the ride home is usually off too); cancelling the ride home leaves it unticked, because the ride out normally still happens. Untick or tick it as you need — one reason and one fee cover both.
- If the trip repeats, choose Cancel just this trip or Cancel this and all N future trips in the series. On a ride home in a standing order there is a third choice — Cancel the ride home on this and all N future days — the rides out stay — which drops the ride home for the rest of the schedule and leaves every ride out on the board. Choosing it hides the Also cancel the ride out box, because keeping the rides out is the whole point of it. See 03 — Repeating schedules.
- Choose a Cancellation fee: No fee, Custom amount…, or Full fare. The box always starts blank — nothing is filled in for you. A small note under it reminds you of the usual amount for this payer (private pay and facility pay: usually the one-way fare; American Logistics: usually $40; CVRC: none, their contract doesn't allow one; other brokers: no set amount, ask before charging) — it is a reminder only, never a suggestion you have to accept. A fee creates the receivable automatically, and only once. Typing Custom amount… and leaving it blank or unreadable stops the button with Enter a fee amount like 45 or 45.50. — the trip won't cancel "with a fee" that never actually got charged.
- On one leg of a round trip, when the other leg is still going to run, you're also asked whether the price stays the same: Keep $… or Change it…. Nobody picks one for you — choose based on the case, and the button stays disabled until you do. A blank or unreadable typed price stops the button too, with Enter a price like 85 or 85.50. When you are cancelling the ride home across a standing order, this is asked once for the whole run — the amount you type in New price, each day is what every one of those days costs as a ride out on its own.
- Click the red button — it reads Cancel both legs when the other leg is included, or Cancel N rides home for a standing order.
Afterwards a short line tells you what happened to the other leg — whether it was cancelled with this one, or left alone and why. For a standing order it says how many days had their ride home cancelled, how many were left alone, and how many rides out were re-priced.
The trip is already marked completed
This happens when a driver taps Dropped off on a trip that did not actually run — it is the only button they have. You do not need to reopen it first.
Click Cancel trip… as usual. A note at the top of the box tells you the trip is marked completed, who dropped it off and when, and that cancelling removes the completion and takes its charge back off Receivables.
The one case it stops you: a trip that has already been paid. Undo the payment on 12 — Receivables first, then cancel.
When the other leg cannot be cancelled with this one
The Also cancel… box only ticks a leg that is still upcoming. If the other leg is in progress or marked completed, the box appears greyed out with the reason, and you cancel that leg from its own panel — open it and use Cancel trip… there.
You can get to it straight from the notice at the top of the panel: where it says "Going leg #8505 … was cancelled by …" there is now a Cancel this leg too button that opens the cancel box with the same reason already filled in.
Steps — changing a cancellation fee
Executive and Billing accounts. Use this when a fee was charged at the wrong amount — for example it should be $90, not $80 — or when it should not have been charged at all (a trip cancelled by mistake, or a miscommunication that was not the client's fault).
- Open the cancelled trip on the dispatch board (or the restored trip — its fee from the earlier cancellation can be changed the same way).
- On the Price & payment row, find the line Cancellation fee $… · invoice #…-C and click Change fee next to it.
- Type the right amount in New cancellation fee — or type 0 if there should be no fee at all. Typing 0 shows a line, "No fee — the fee invoice will be cancelled," so you can back out with Cancel before saving.
- Click Save.
The fee invoice on 12 — Receivables and the trip change together, in one step, and the change is recorded against the trip with the old and new amounts. If the invoice was already sent to the payer, a note under the box reminds you to send them the new amount too.
Typing 0 waives the fee. Instead of leaving a $0 invoice sitting open, the #…-C invoice is voided (the same as any other voided invoice — it drops off Receivables and out of the totals there) and the trip's line changes to No fee (waived). This cannot be undone from here; if the fee turns out to be owed after all, click Restore trip, then Cancel trip… again with the fee — that creates a new fee invoice.
Change fee only appears while the fee invoice is still open. Once it is paid, in collections or already voided, the fee is locked and the link is gone — that includes a fee already waived to $0. A voided fee is not billed at all; its line reads Voided (or No fee (waived) if it was voided by typing 0 here). If a paid fee was wrong, undo the payment on 13 — Recording payments first, then it can be changed (including waived) the normal way.
Steps — after a driver cancels from their phone
A driver who cancels from their phone never sets a price or a fee — the office decides. So the trip that needs a decision gets an amber band at the top of its panel, and the bell shows an alert that opens it. The band stays until someone settles it.
The band says who cancelled which trip, when, and whether it was at the door or before arriving, with the driver's reason.
When part of a round trip still runs — the band reads "Cancelled by the driver — confirm the price for the ride home" (or "…for this round trip"):
Click the alert in the bell, or open the trip on the dispatch board. The band is on the ride home (the leg that still runs), not on the trip the driver cancelled.
Choose the price:
- Keep it at $… — the full round-trip price stays.
- Charge half: $…
- Another amount… — then type it in New price.
Nobody is picked for you — choose based on the case, and Confirm price stays disabled until you do.
Click Confirm price. The band disappears, the alert leaves the bell for everyone, and an open invoice updates with the new price.
When nothing of the trip runs any more — a one-way trip, or the driver also cancelled the ride home — the band reads "Cancelled by the driver — decide the cancellation fee":
- Open the trip the same way.
- Choose a Cancellation fee: the dropdown always starts on Choose… — nothing is picked for you, not even No fee. Pick No fee, Custom amount… (type it in Amount), or Full fare (only offered when the trip has a price). A small note under the dropdown shows the usual amount for this payer, the same reminder as the office cancel panel — it never fills the field in for you.
- Click Done — it stays disabled until you have picked one of the three (and, for Custom amount…, typed a valid amount). This is on purpose: a driver cancelling from their phone at the door had been settling itself as No fee the moment Done was clicked, before anyone chose anything. A fee creates the receivable on 12 — Receivables, the same as when the office cancels a trip with a fee. Picking No fee yourself just clears the band — that is different from the band settling itself with no fee.
The trip the driver cancelled keeps its Cancelled by the driver row for good, so the answers are there if the client disputes a charge.
Marking a cancellation fee invoiced or paid
A cancellation fee gets its own invoice (#…-C), separate from the trip's fare, so it has its own buttons, Mark fee invoiced and Mark fee paid — the fare's Mark invoiced / Mark paid on the same Price & payment row never touch it.
- Open the trip — a cancelled one, or one that was cancelled with a fee, then restored and run. Under Price & payment, find the line Cancellation fee $… · invoice #…-C.
- While that line reads Open, click Mark fee invoiced once the payer has actually been sent the bill. This is optional — you can go straight to Mark fee paid if the payment already came in.
- Once the money is in hand, click Mark fee paid. The line updates to Paid right away, and the payment shows on 13 — Recording payments the same as any other.
Both buttons disappear once the fee is Paid, In collections or Voided — there is nothing left to mark at that point. Executives, Billing and Dispatchers see these buttons by default; an Intake account does not, the same rule as the fare's Mark invoiced / Mark paid.
Good to know
- Most edits are only offered while the trip is upcoming or in progress. A completed trip has to be reopened first — except cancelling it, which works directly.
- Marking a trip complete is what creates the receivable. It then shows on 12 — Receivables.
- Mark invoiced and Mark paid appear on a completed, unpaid trip, for the fare. Executives, Billing and Dispatchers can use them by default.
- A cancellation fee has its own Mark fee invoiced / Mark fee paid, next to the fee line, for the fee invoice only — marking one never marks the other. Same accounts, by default.
- Voiding an invoice, undoing a payment and Change fee are Executive and Billing only.
- Who pays and Change Bill to are open to Executive, Billing and Dispatcher accounts by default — an Executive can turn either off for a role in Settings → Permissions.
- Who pays set here applies to this trip only — the client's usual setting is untouched.
- Change Bill to changes the client's usual facility only when you tick Also set as this client's usual facility.
- Every change is recorded against the trip, including who overrode a safety warning and why.
- A two-driver trip counts once in the trackers and bills once.
If something looks wrong
- "Trip #… is the ride out, not the ride home." — the standing-order choice only works from the ride home. Open the ride home for that day and cancel from there.
- "Couldn't save the price. Only Executive and Billing accounts can change it." — your account isn't allowed to change prices. An Executive can turn this on for your role in Settings → Permissions.
- I don't see Keep / Charge half on the amber band — your account can't change prices. You can still click Confirm price to keep the price as it is, or ask billing or an Executive to change it.
- "A dispatcher or billing account confirms this." in the amber band — your account type can't settle it. Ask dispatch or billing.
- Done stays greyed out on the "decide the cancellation fee" band — pick one of No fee, Custom amount… or Full fare first; the box always starts on Choose…. For Custom amount…, also type a plain amount like 45 or 45.50.
- I don't see Mark invoiced or Mark paid next to a cancellation fee — either the fee is already Paid, In collections or Voided (there is nothing left to mark), or your account type doesn't have that permission — ask dispatch or billing, or an Executive can turn it on in Settings → Permissions.
- "A dispatcher or billing account marks this invoiced or paid." next to a cancellation fee — same as above; your account can't do this one.
- "Your account can't charge a cancellation fee." — fees need the same permission as cancelling a trip. Ask dispatch or an Executive.
- "Trip #… already has a $… cancellation fee on invoice #…-C. To change it, click "Change fee"…" in the amber band — the trip already has a fee. Close the band with No fee and Done if the fee is right, or have an Executive or Billing account click Change fee on the Price & payment row (see Steps — changing a cancellation fee).
- Receivables still shows the old fee — the fee was changed some other way than Change fee. Use Change fee on the trip; it changes both at once.
- "Enter a fee like 45 or 45.50, or 0 for no fee." — the amount typed in New cancellation fee was blank, not a number, or negative. Type a plain amount, or 0 if the trip should not be charged at all.
- An amber line under the cancellation fee says "The trip record says $…" — the trip and its fee invoice disagree (it could happen on trips cancelled a second time before 2026-09-23). The invoice amount is the one being billed. Click Change fee, type the right amount and Save; both then match.
- "Trip #… already has a $… cancellation fee on invoice #…-C, from when it was cancelled before." — you are cancelling a restored trip again. Pick Keep the $… fee, or a new amount, in the Cancellation fee box.
- "This trip was cancelled with a fee, then restored and run, but its fare was never billed." (amber, under the fee) — this can only be on a trip restored and completed before this was fixed in September 2026. To bill the fare: click Reopen — back to scheduled, then Mark complete. The fare invoice is created and the fee invoice is not touched.
- A trip has two invoices, #… and #…-C — correct when the trip was cancelled with a fee, restored, and then ran: one is the fare, the other the fee. The sentence under the fee on Price & payment says so. See A restored trip that had a cancellation fee.
- I don't see Who pays or Follow-up notes — you are signed in with an Intake account, which can't open billing records. Ask dispatch or billing.
- "The billing details for this trip couldn't be loaded." on the Who pays row — only that part failed; the rest of the panel is fine. Close the trip and open it again.
- "This trip couldn't be shown." instead of the panel — click Close and open the trip again. If it keeps happening, note which trip it was and let Josue know. The board itself keeps working.
- "Only Executive and Billing accounts can change a fee that is already charged." — pick Keep the $… fee to cancel the trip, then ask billing to use Change fee if the amount is wrong.
- "Invoice #…-C is already paid, so its fee can't be changed." (or is in collections) — the fee is locked. Undo the payment first if it was wrong.
- Nothing is picked for me — that's normal. It only appears when the other leg is still going to run: pick Keep or Change… and type whatever number is right — the button stays disabled until you do. If your account can't change prices, you won't see the radio buttons at all; ask someone with Edit trip prices.
- "Enter a price like 85 or 85.50." or "Enter a fee amount like 45 or 45.50." — the box is blank, or what you typed isn't a number. Type a plain figure with no dollar sign; the button unlocks once it reads it.
- "The price is locked" — the invoice has already been paid. Undo the payment first (Billing or Executive).
- Who pays says "Set when the trip is completed." — the trip has no invoice yet. It is filled in when the trip is marked complete.
- The Who pays dropdown is greyed out — your account type doesn't have this permission. Ask an Executive to turn on Change who pays / Bill to on a trip for your role in Settings → Users & roles → Permissions.
- Bill to shows a name with "from client's facility" under it — nobody has confirmed it yet; it was worked out from the client's usual facility. If it is right, click Change Bill to and Save Bill to to confirm it. If not, pick the right one.
- Bill to says "Bill to not set" — the client has no usual facility and the trip has no broker. Click Change Bill to and pick who pays.
- The wrong facility is on the invoice — click Change Bill to on the trip (or on the invoice's row in Receivables) and pick the right one. The trip changes with it, so it won't come back on the next invoice for this trip. If the client's record has the wrong usual facility too, tick Also set as this client's usual facility.
- I don't see Change Bill to — your account type doesn't have this permission. Ask an Executive to turn on Change who pays / Bill to on a trip for your role in Settings → Users & roles → Permissions.
- "Invoice #… is already paid, so its Bill to can't be changed." (or is in collections, was voided) — only an open invoice's Bill to can change. If a paid invoice went to the wrong payer, ask Josue.
- The return leg shows $0.00 — that is correct. Look for "Billed on trip #…" underneath; the money is on the other leg.
- The Assignment Protection Engine blocked this — a safety rule was broken. Read the reasons in the message; you can push it through by typing a reason, which is recorded.
- The ride home is still on the board after cancelling the ride out — the Also cancel the ride home box was unticked. Open that trip and cancel it.
- "Return leg missing" or "Return leg #… was cancelled" — use Add return leg rather than re-booking the whole trip.
- The going leg was cancelled but the ride home is still on — the panel says so at the top; the ride home runs as booked and is billed as itself.
- I can't find Cancel on this trip — it is on upcoming, in-progress and completed trips. On an already cancelled trip there is nothing to cancel; use Restore trip if it should not have been.
- "Trip #… has already been paid" — cancelling would leave money recorded against a trip that did not happen. Undo the payment in Receivables, then cancel.
- The client's name is misspelled — click the client's name at the top of this panel (or find them on 08 — Customers) and edit First name and Last name. The correction shows on every trip, past and upcoming.
- The pickup shows a place name with no street — the facility has no address saved. Add it on 09 — Facilities & brokers and it appears on this trip, the run sheet and the driver's phone straight away.
- There is no edit link on the Pickup or Destination row — the trip is marked completed (or cancelled). Click Reopen — back to scheduled, make the change, then Mark complete again.
- A change didn't reach the rest of a repeating schedule — check you picked all future trips rather than just this trip.
- The client's phone changed but the panel still shows the old one — the Client phone row updates with the record. The Person calling · at booking row is a record of who rang at the time; when you change a client's phone on their record, upcoming trips where they were the person calling are updated too, but trips where a facility or relative called keep that caller's number.